Databricks intro
0. Overview
Databricks provides a Unified Analytics Platform that accelerates innovation by unifying data science, engineering and business.
You can try it if you register Databricks.
There are two options:
- Community Edition: this is free but you only can use a single small cluster.
- Databricks Plaform: use this option if you plan to create your own clusters. It has 14 days of free trial and you will need to pay for the machines you use for the clusters
I suggest you start trying it with the Community Edition
1. Clusters
1.1. Cluster creation
In order to use databricks you will first need to create a cluster. The available options will change based on the Databricks version you are using.
1.1.1. Community Edition Version
With this version you can configure more things.
1.1.1.1. Cluster mode
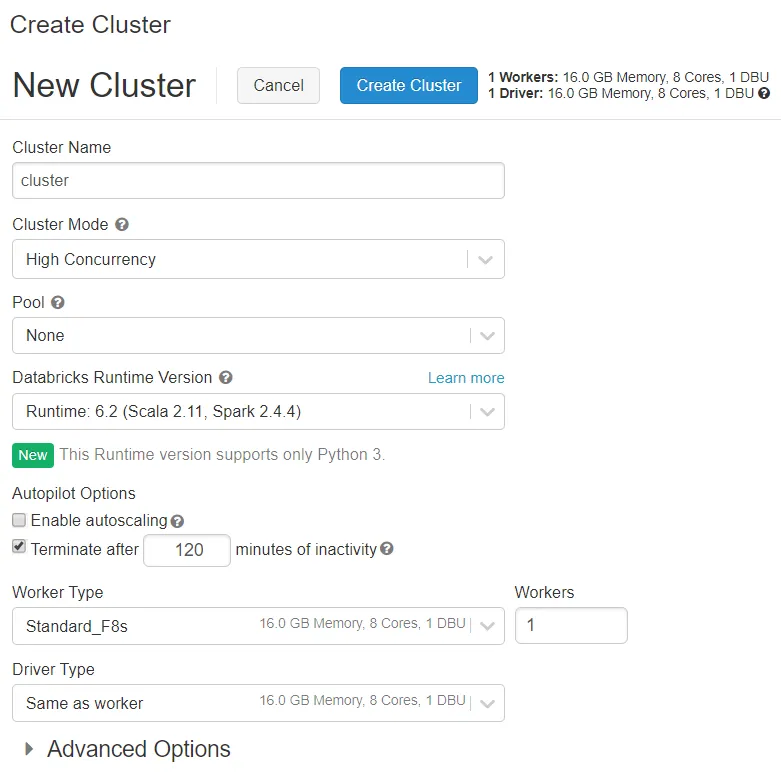
The default mode is standard and will work well for 1 user.
For multiuser use high concurrency.
If you want to use scala you must use standard cluster mode
1.1.1.2. Databricks runtime version
Databricks runtimes are the set of core components that run on Databricks clusters.
This will decide the python, R and spark version as well as some pre instaled libraries.
You can read more about the versions of each databricks runtime in Databricks releases notes.
1.1.1.3. Python version
Use python 3. Python 2 is deprecated so please do not use it.
1.1.1.4. Autopilot
The first paramter is Enable Autoscaling.
This will allow to create more workers for the cluster if needed and of course it will mean that the cost might increase as you need more machines.
There is the terminate after param that sets the minutes of inactivity before shutting down the cluster.
1.1.1.5. Environ vars
By clicking Advanced Options and then Spark you can set the Environment Variables.
This is really useful to do some configuration at the cluster level.
1.1.2. Community Edition Version
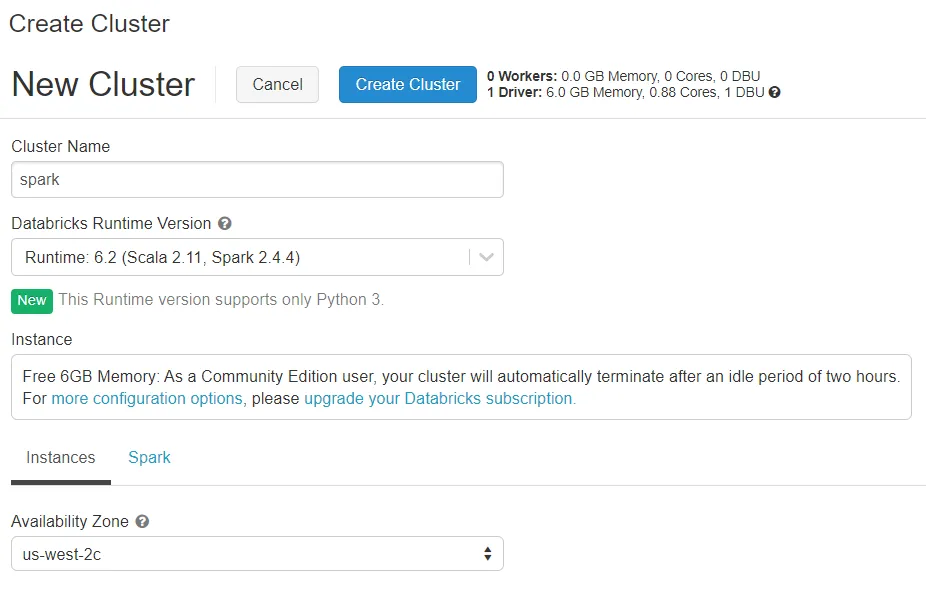
If you are using the Community Edition version of databricks is really easy to create a new version.
You only need to write a cluster name and decide the databricks runtime version.
1.2. Permissions
In Advanced Options / Permissions is where permissions are set.
The available options are:
- Can Attach to: this means that they can use the cluster
- Can Restart: allows to start, restart and close the cluster
- Can Manage : admin privilege
1.3. Libraries
There are multiple ways of installing python libraries:
- Using databricks runtime
- With an init script
Librariessection in Cluster configuration- Using
dbutils
With databricks runtime some basic libraries will be installed. The good part is that you have those libraries available but at the cost that it is not easy to change the default version of that library.
For some libraries that will need some different configuration on the driver and the workers machines it is useful to install them using an init script.
dask is a good example of them since it is needed to start both the worker and the driver.
The default way for new libraries should be using the Libraries section.
From there you can install eggs from a blob storage or directly using PyPI.
You can see an example of the libraries installed on a cluster:
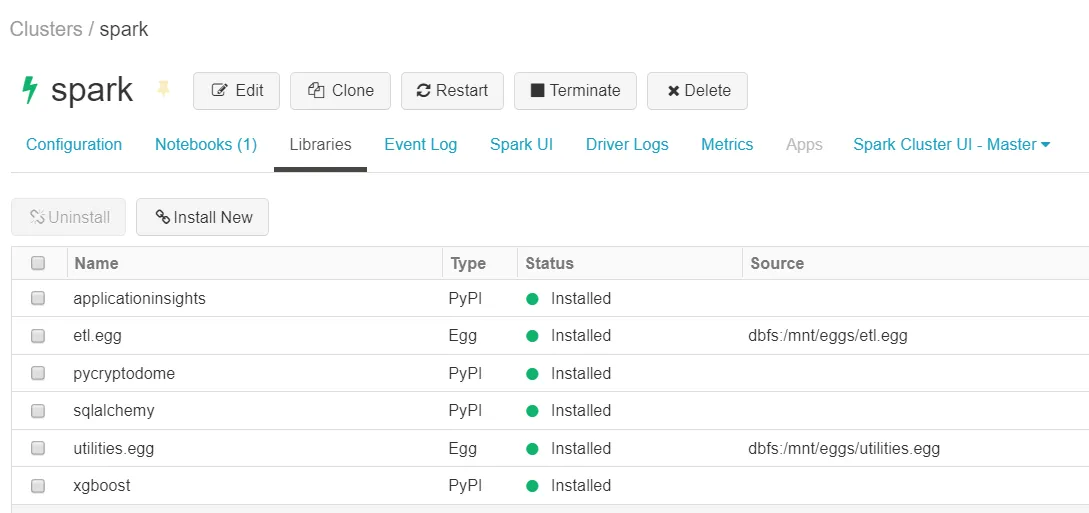
It is not possible to install python wheels, use eggs instead.
And lastly you should avoid installing libraries using dbutils.
This also won’t work if you are using a conda databricks runtime.
1.4. Logs
There are some kind of logs:
- event logs
- driver logs
- standard output
- standard error
- log4j output
- spark logs
- worker standard output
- worker standard error

1.4.1. Event logs
In this section is possible to view the actions performed to the cluster. For example a start of the cluster will be registered here.
1.4.2. Driver logs
Those are the logs that the driver machine writes.
The standard output and standard error are self explanatory.
The log4j output is the output that spark uses.
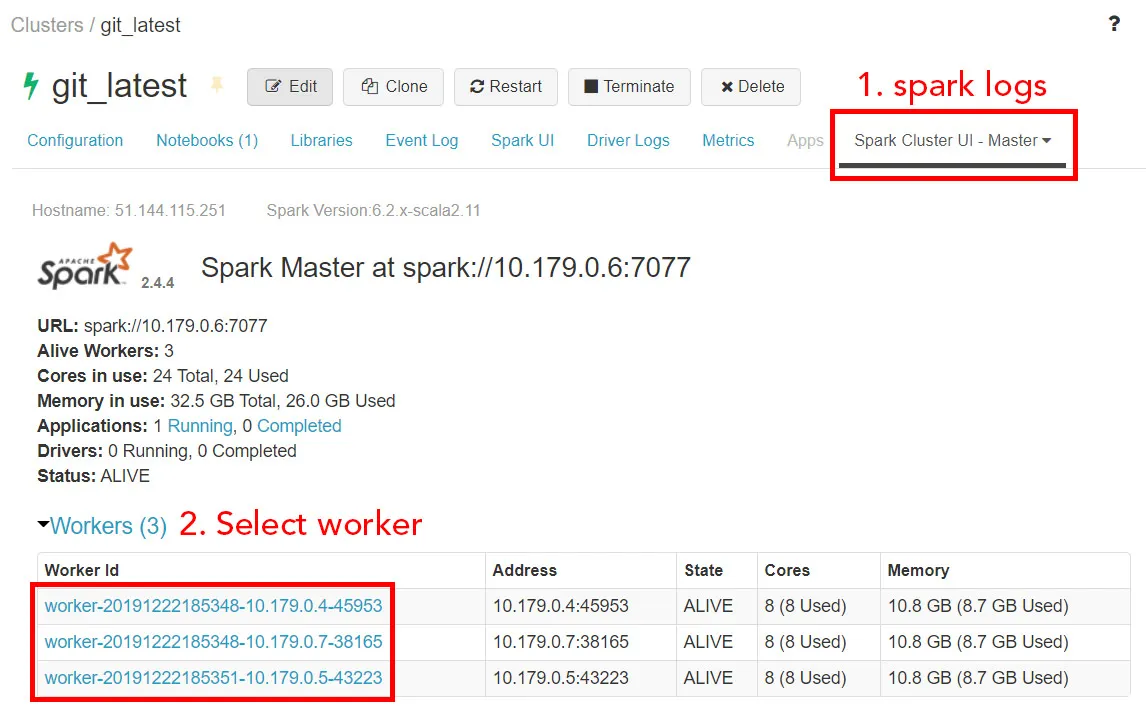
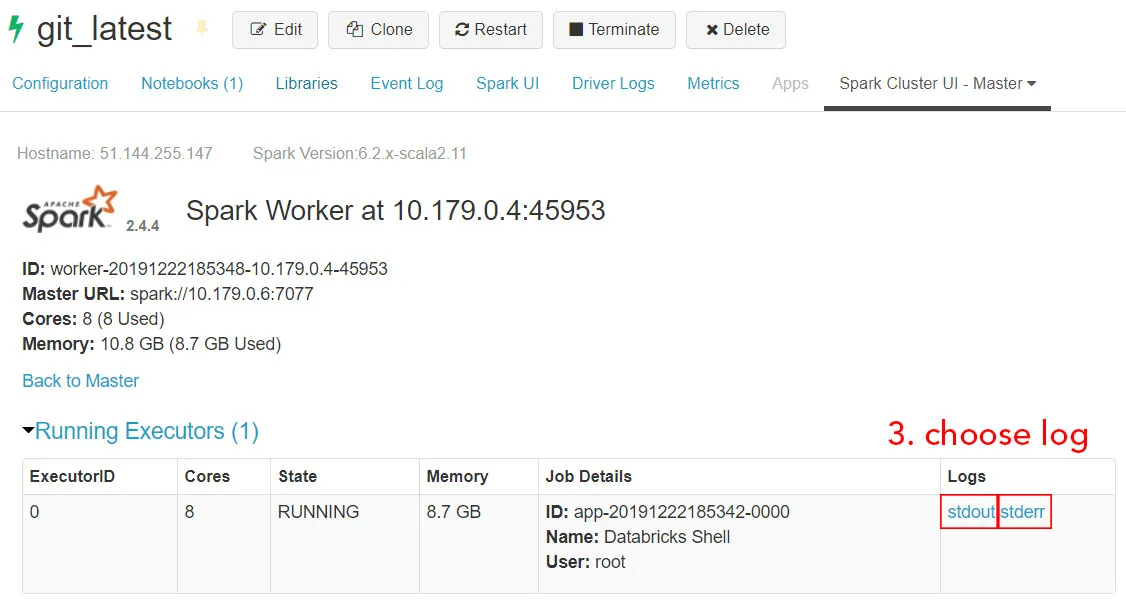
1.4.3. Spark logs
This allows to access the stdout and stderr logs of each spark worker.
2. Notebooks
The way to work with databricks is by using notebooks.
They are really similiar to the Jupyter notebooks so it should be easy if you already know them.
Once you create a new notebook you will need to set:
- name
- language
- cluster
You can later rename the notebook or attach it to another cluster if needed.
2.1. Multilanguage
You can work with multiple languages in the same notebook even though there is a default one.
To do so you only need to use some magic commands like %python to work with python.
No need to use anything to work with the default language
The languages you can use are:
| language | preffix |
|---|---|
| python | %python |
| markdown | %md |
| Linux commands | %sh |
| SQL | %sql |
| R | %r |
| scala | %scala |
2.2. Spark
One of the great things about databricks is that it comes with spark install, configured and already imported.
To use spark you can simply call spark.
For example you could run in python spark.sql("SELECT * FROM my_table").
2.3. dbutils
Databricks comes with a class that has some utilities. This have 3 main functionalities:
- Secrets (
dbutils.secrets) - File system (
dbutils.fs) - Widgets (
dbutils.widgets) - Package installer (
dbutils.library)
2.3.1. dbutils.secrets
This allows to interact with secrets. In Azure you will connect it to a Key Vault so that you can retrieve secrets from there.
2.3.2. dbutils.fs
This allows to write and read files. It is also used to mount external storage units such as a datalake or a blob.
2.3.3. dbutils.widgets
You can create custom widgets that allow you to interact with the notebook. For example you can create and dropdown that sets the value of one python variable.
2.3.4. dbutils.library
This allow you to install packages.
I would advise to manage libraries with the Libraries section of the cluster configuration.
If you are using a conda environment dbutils.library won’t work.
2.4. display and displayHTML
The display object is mainly used to show tables.
You can pass a spark or pandas dataframe and it will be nicely displayed.
It also allows to create plots based on the dataframe.
displayHTML as the name suggest allows to display HTML content.
It is the equivalent of an iframe in HTML.
3. Storing and reading data
Databricks come with a folder where you can store data.
It is under the path /dbfs/FileStore.
Hower I suggest that you mount your own external unit and store the data there.
One important aspect for reading and writting data is the paths.
Imagine that you have a table stored in /dbfs/mnt/blob/data.delta.
To read that in different languages you should:
| language | sentence |
|---|---|
| python | /dbfs/mnt/blob/data.delta |
| sh | /dbfs/mnt/blob/data.delta |
| spark | dbfs:/mnt/blob/data.delta |
| SQL | SELECT * FROM delta.`/mnt/blob/data.delta` |
4. Scheduling jobs
You can schedule jobs with the section Jobs.
It works like the Linux chron.
It should only be used for small tasks since it is not an orchestrator like Airflow or Azure Data Factory (ADF).


