
Intro
In this post I’ll explain how to:
- Set up your Prefect Server.
- Create
Deployments. - Connect to the Server.
If you are not familiar with Prefect I suggest you read Prefect Essentials first.
Setting up a Prefect Server
This section is based on Hosting a Prefect server instance guide.
The simplest configuration that can work in production consists of three main components:
- A database for the server.
- The
prefect server. - At least one
prefect worker.
For the database, I opted for a postgres instance hosted on AWS.
Prefect is designed to scale well beyond this basic configuration (more information in Deploying Flows to Work Pools and Workers), but for the purposes of this post, I’ll focus on the fundamental setup.
This basic configuration suffices for my needs, as I primarily use prefect workers to trigger various AWS jobs and tasks using boto3, including:
lambdasecstasks withfargateemr serverlesstasks
Hence, a single worker adequately serves this setup.
Creating the Prefect Server
To create the Prefect Server, we need a simple docker container with prefect installed.
While there are no official images for a docker server, we can use the official one meant for workers.
The setup process involves providing the correct configuration for the database:
/Dockerfile.server
# Prefect version must match Dockerfile.worker and pyproject.toml
FROM prefecthq/prefect:2.16-python3.10 AS base

# Set connection (format: `postgresql+asyncpg://{user}:{password}@{url}:{port}/prefect`)
ARG DB_URL
RUN prefect config set PREFECT_API_DATABASE_CONNECTION_URL="${DB_URL}"
RUN prefect config set PREFECT_SERVER_API_HOST=0.0.0.0

CMD ["prefect", "server", "start"]
If you attempt to run this with the database inside a docker container, you may encounter networking issues. It’s strongly recommended to use Prefect example with Docker compose to see how to handle it with docker compose.
To create the docker image, execute the following command, replacing XXX with the database URL. For a postgres database, the format should be like postgresql+asyncpg://{user}:{password}@{url}:{port}/prefect:
docker build --build-arg DB_URL=XXX -f Dockerfile.server -t northius/prefect/server .Once the Prefect Server is set up, you can access the web UI.
If it’s running locally, you can find it at localhost:4200.
However, the server won’t be able to run any flow without a worker.
To deploy the server somewhere, like AWS ECS running as a Service with Fargate, ensure to provision a public URL so that other components can connect to it.
Ensure to secure the server behind a VPN to prevent unauthorized access.
Creating a Prefect Worker
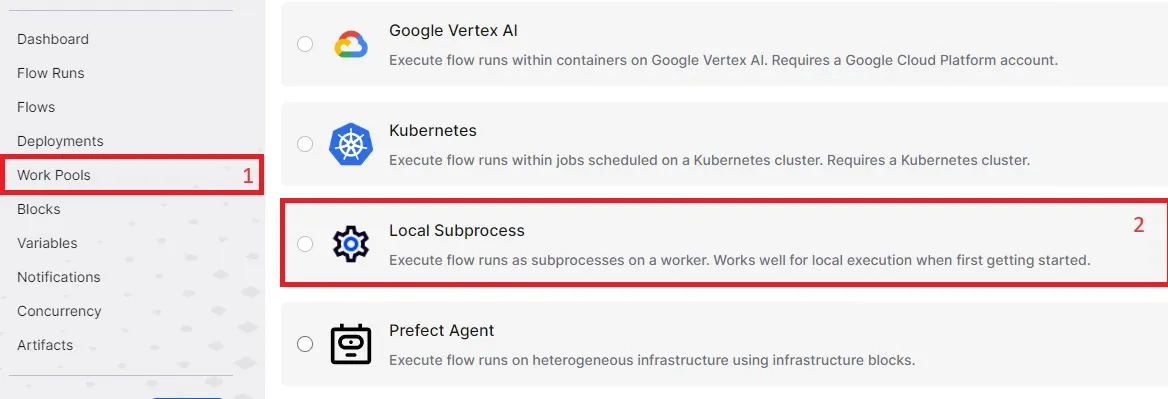
To create a Prefect Worker, we first need to create a Work Pool so that the Worker we create can join it.
We will use a local subprocess work pool.
Given that we will only use it to trigger other services with boto3, it should be more than enough.
If needed, we can always change it to an ECS task and/or add more workers.
You can do this using the Prefect UI:
Once you have the Work Pool, we will create a Worker with Docker, following a similar approach to the Server:
/Dockerfile.worker
# Prefect version must match Dockerfile.server and pyproject.toml
FROM prefecthq/prefect:2.16-python3.10 AS base

# Connect to Prefect
ARG PREFECT_API_URL
ENV PREFECT_API_URL=${PREFECT_API_URL}

# Allow to config pool_name
ARG POOL_NAME=subprocess-pool
ENV POOL_NAME=${POOL_NAME}

ENTRYPOINT prefect worker start --pool ${POOL_NAME}
Make sure that the Prefect versions match in both Dockerfiles.
Similarly to before, we can build the image with:
docker build --build-arg PREFECT_API_URL=XXX -f Dockerfile.worker -t northius/prefect/worker .Replace XXX with the Prefect API URL. It should be like https//{server_url}/api.
As before, you will need to run this docker container somewhere. In my case, I’ll also run it as another ECS service using Fargate.
Deployments
As the official documentation states in Prefect Deployments:
Prefect Deployments are server-side representations of flows. They store the crucial metadata needed for remote orchestration including when, where, and how a workflow should run Deployments elevate workflows from functions that you must call manually to API-managed entities that can be triggered remotely.
In my case, I’ll use them to define:
- The different flows I want to run
- From where they will get the code (a GitHub repo)
- When the flow should be run (schedule)
Getting the code
The first thing you will need to do is to create a Prefect Block (more info at Prefect Essentials | Using prefect blocks) to store the GitHub credentials if the repo is not public.
Once done, we can define how to get the code and the dependencies with:
/prefect.yaml
pull:
- prefect.deployments.steps.git_clone:
    id: clone-step
    repository: https://github.com/github_user/repo.git
    branch: main
    credentials: "{{ prefect.blocks.github.github }}"
- prefect.deployments.steps.pip_install_requirements:
    requirements_file: requirements.txt
    directory: "{{ clone-step.directory }}"
    stream_output: False
This will only work if there is a GitHub block called github with a token that allows reading the repo.
This is only needed if the repo is not public.
Creating the first Deployment
Now that we’ve defined how to fetch the code, we will create the first Deployment.
Add the following code to the prefect.yaml you just created.
/prefect.yaml
- name: lambdas.athena_history
  description: Export Athena history with a lambda
  entrypoint: src/lambdas/lambdas.py:athena_history
  version: 0.1.0
  work_pool:
    name: subprocess-pool
  tags: ["type:prefect", "group:lambda", "job:athena_history"]
Here is what we are setting:
| variable | description |
|---|---|
| name | The name you want for the deployment |
| description | Description of what the deployment does |
| entrypoint | Where is located the flow. It is path/to/filename.py:flow_name |
| version | The version of the flow |
| work_pool | Which work pool should run the deployment. It references what we created before |
| tags | Any tags you want to add to all flow_runs that will come from this deployment |
Now you can deploy this to the prefect server with:
set PREFECT_API_URL=XXX
prefect deploy --all
Replace XXX with the Prefect API URL.
It should be like https//{server_url}/api.
This will deploy all Deployments in prefect.yaml to the server.
Now you can head to the server and trigger a run of the Deployment from there.
Advanced Usage of Deployments
What we’ve created works fine, but once you start adding multiple Deployments, you will probably encounter a lot of repetition.
To avoid this, you can define some defaults that will be later used in each Deployment with:
/prefect.yaml
definitions:
  work_pools:
    subprocess-pool: &subprocess-pool
      name: subprocess-pool

  version: &version
    version: 0.1.0

  # Define defaults (that can be overwritten)
  defaults: &defaults
    <<: *version
    work_pool: *subprocess-pool
    tags: ["type:prefect"]
You can read more about YAML alias nodes.
With that, you can reuse the defaults like so:
/prefect.yaml
- name: lambdas.athena_history
  <<: *defaults
  description: Export Athena history with a lambda
  entrypoint: src/lambdas/lambdas.py:athena_history
  tags: ["type:prefect", "group:lambda", "job:athena_history"]

- name: lambdas.emr_history
  <<: *defaults
  description: Export EMR history with a lambda
  entrypoint: src/lambdas/lambdas.py:emr_history
  tags: ["type:prefect", "group:lambda", "job:emr_history"]
  schedules:
    - cron: "0 3 * * *"
Notice that you can overwrite the defaults.
For example here we are overwriting tags.
Deploying deployments
We’ve seen how to manually deploy the Deployments, but it’s better to do it with Continuous Deployment (CD).
Deploying with Continuous Deployment (CD)
Here, you will only need a GitHub Action (or any CD equivalent) that:
- Detects changes to
prefect.yamlon commits to themainbranch - Deploys all flows to Prefect
The only change you will need to make is to add --no-prompt so that it doesn’t expect user confirmations:
prefect --no-prompt deploy --allYou can redeploy an already existing Deployment without losing any data.
It will simply update whatever has changed.
Manual deploy
One really cool thing you can do is to manually deploy Deployments when you are creating a new one.
Here’s what I do: change the branch reference in prefect.yaml to the current branch where I am developing by with:
/prefect.yaml
prefect.deployments.steps.git_clone:
    id: clone-step
    repository: https://github.com/github_user/repo.git
-    branch: main
+    branch: your_current_branch
    credentials: "{{ prefect.blocks.github.github }}"
And then you can deploy the Deployment you are working with:
prefect --no-prompt deploy --name lambdas.athena_historyIt is important to specify only the Deployment you are developing so that you don’t interfere with the other Deployments you might have running in production.
Once you finish your work and do a commit to main, the CD will overwrite the branch reference so that it points to main.
Notice that any Deployment run you do will fetch the code from the branch you set and run.
That implies that if you are changing only your code you do not need to deploy at each commit.
You will only need to deploy if you change:
- The reference
branch - The flow configuration (
name,parameters,tagsetc.)
Connect to Prefect Server
Now that we have a working server, we want to connect everything that runs flows to the server so that we can track everything.
To connect to the server, we only need the following environment variable:
PREFECT_API_URL=XXXRemember, you need to replace XXX with the Prefect API URL.
It should be like https//{server_url}/api.
Connect Docker
For anything that runs in a Docker container (such as dbt in my case), you can follow the same approach we did in the Prefect worker.
We need to set an argument for the API URL and then store it as an environment variable with:
ARG PREFECT_API_URL
ENV PREFECT_API_URL=${PREFECT_API_URL}
And then when we build it, we need to add the following argument:
--build-arg PREFECT_API_URL=XXXConnect EMR
In EMR, we need to set the environment variable at the driver.
We can do that by adding the following configuration:
--conf spark.emr-serverless.driverEnv.PREFECT_API_URL=XXXThis is for EMR serverless but is very similar for the non-serverless EMR.
Handling Multiple Environments
You probably have multiple environments such as pre, pro, and maybe also sandbox.
With the Prefect Server, you have 2 options:
- Creating a server per each environment
- Having a central server that can trigger runs to multiple/any environment
With a dedicated server, you will have better isolation but it would be more work to maintain and will have greater costs.
In my case, I wanted simplicity and lower costs so I went with a central server.
In that case, the only important bit is you will need to pass to each flow the env variable as a parameter, and then you will need some code to assume different roles per environment.
Useful Code Snippets
Here you have some snippets that can help you get started.
Updating Tags Dynamically
One really cool thing you can do with Prefect is to dynamically edit the tags of each flow at runtime.
In my case, it’s very useful for tagging the environment where the flow is running (such as env:pro or env:pre).
You can do it with:
/src/common/prefect_utils.py
import asyncio

from prefect import get_run_logger
from prefect.client import get_client
from prefect.context import get_run_context


def update_tags(tags):
    logger = get_run_logger()
    if not tags:
        logger.warning("No tags passed to 'update_tags', nothing to do")
        return True

    logger.info(f"Adding {tags=} to current flow_run")

    # Read current flow
    flow_run = get_run_context().flow_run
    tags += flow_run.tags

    client = get_client()
    asyncio.run(client.update_flow_run(flow_run.id, tags=set(tags)))
    return True
This example only works when called from a flow. If you want to run it from a task, you will need to fetch the task instead.
Running a Lambda
Here you have the simplest example I have for running external jobs from Prefect. This calls any lambda you might want:
/src/lambdas/base.py
from prefect import get_run_logger
from prefect import task

from src.common.session import get_session


@task(name="prefect.lambdas.run")
def _run_lambda(client, name):
    logger = get_run_logger()

    response = client.invoke(
        FunctionName=name,
        InvocationType="RequestResponse",
        LogType="None",
    )

    if (status_code := response["StatusCode"]) == 200:
        logger.info(f"Lambda {name=} completed successfully")
        return True

    logger.error(f"Lambda {name=} failed with {status_code=}")


def run_lambda(env, name):
    logger = get_run_logger()
    logger.info(f"Running lambda {name=} in {env=}")

    client = get_session(env).client("lambda")
    _run_lambda(client, name)
Defining a Flow for Each Possible Lambda
With the base.py code for running lambdas, you can define a flow for each lambda you have.
As an example, we could have:
/src/lambdas/lambdas.py
from typing import Literal

from prefect import flow

from prefect_northius.lambdas.base import run_lambda


@flow(name="prefect.lambdas.athena_history")
def athena_history(env: Literal["snd", "pro"]):
    run_lambda(env, "nt-lambda-function-athena-history")


@flow(name="prefect.lambdas.emr_history")
def emr_history(env: Literal["snd", "pro"]):
    run_lambda(env, "nt-lambda-function-emr-history")
Remember to declare those flows in the prefect.yaml.